
Earlier this summer, I was browsing through some beautiful hand dyed yarn online. They were all so unique and filled with amazing colour combinations that were so creatively inspiring. While scrolling through Etsy, I discovered yarn dye kits. Hand dyed yarn seemed like something that was way out of my skill level. I didn’t know anything about the process and I certainly lacked appropriate studio space to create my own. But guess what? It WAS something I could do and I’m so glad I tried it. Let me share some of the experience with you:
I ordered my kit through Etsy from Fibre Art Studio which is based in Vancouver, British Columbia. Click here to check out the online Etsy shop. At the time of this posting, the yarn dye kit is available. Shipping was fast (keep in mind this is during a pandemic so I was extremely impressed with how quickly the package arrived).
I ordered the “complete kit” which contained 4 bottles of powdered acid dye, a small package of citric acid, 1 full skein, 1 mini skein and instructions. There was also a lovely business card and a pin which is awesome because who doesn’t like crafty pins? There was a promotion that included 1 extra mini skein with this particular kit and I added 1 extra full skein to my order as well. Total, I ended up with 2 full skeins and 2 minis. It was beautifully packaged and everything arrived in perfect condition.


The yarn included was mixed fibre content made up 80% wool and 20% nylon. After unboxing everything, I headed over to Facebook to watch an accompanying video that shared some of the story and process regarding this kit. It included some helpful information and ideas on distributing the dye, basic set up and a walk through. You’ll also meet Yoriko who is an indie yarn dyer, weaver and the hard working person who puts all of these yarn dye kits together. You can find the video here. (Hi Yoriko!)
I’m not going to share everything about this kit. Yoriko has worked hard putting it together and I don’t want to give away the time and effort she put into the overall preparation. But, please do take a few moments to check out the links above to learn some more from Yoriko herself.
One thing about this kit that I was not prepared for was the preparation that went into the yarn prior to the dyeing process. However, this was not a bad thing! It was actually extremely interesting and allowed me to learn more about the overall steps that are involved in something like this. The importance of hand washing yarn before dyeing it was not something I really thought about. To understand more about the full dyeing process was very eye opening.

I used foil casserole pans from the grocery store for soaking. I heard you shouldn’t use aluminum when dyeing yarn (oops). It’s all I had and seemed to work fine for the purpose of a DIY kit. After a gentle soak to remove excess oils from the spinning process, I carefully squeezed out the excess water and let them dry for a little bit.
Now came the really fun part. I placed my washed yarn into the plastic lids that came with the foil casserole pans and prepared my dye. Again, I’m not going to give too much of those details away but it was a simple step. In the video I mentioned above, Yoriko provided some ideas and techniques on how to dye the yarn. I tried a few methods but got excited and decided to just go all out and squirt the dye directly onto the yarn. As you can see in the photo, there are some gloves which is a good idea to have on hand (literally) for a project like this.

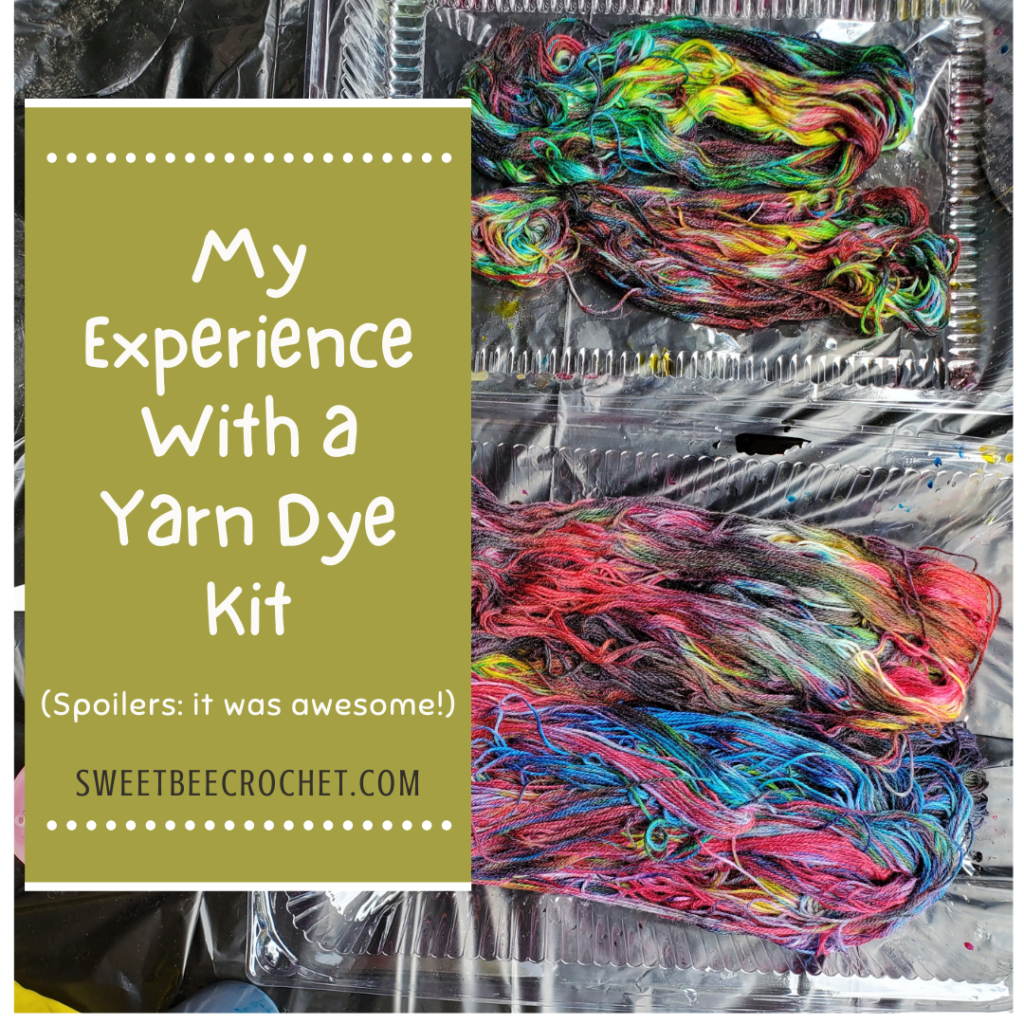
I was aiming for a fall themed colourway with the large skeins. I did have a pattern in mind for this yarn so I already had a bit of an idea of how I wanted it to look. More on that later though!
The mini skeins had a carnival theme to them. Bright summer colours mixed in with some darker shades that you might find later in the season. I was inspired by our hometown fair that we attend every year. I love how the minis turned out but in retrospect, it also might have been nice to make the minis a solid colour to create a matching accent to the full size skeins. Something to think about and plan for next time!
After the fun with dyeing came another yarn bath. This one took me awhile because I used a lot of dye. I was basically washing out as much extra dye as possible until the water ran fairly clear. I used gloves for this step as well.
Once the water was running clear from the yarn, I hung the skeins outside on a laundry rack to dry. They were fully dry within 24 hours.


The skeins look a little twisted and knotted in spots hanging in the photo but they were actually nice and neat. It was a pretty windy day! There are little ties of yarn that come around the skeins to keep it from getting tangled during the process.
After drying, I found a video online that showed how to make those pretty twists that you often see with hand dyed yarn. I could easily have wound it with my swift and winder but then I would miss out on taking pictures of the finished pieces! Instagram pretty, am I right?

And there are my own hand dyed yarns! I was SO thrilled with how they turned out. The process might sound intimidating but this DIY kit made it so easy and fun. I learned some new things and gained a whole new level of respect for indie dyers who do this as a full time business. It was truly eye opening for me. The amount of work, care and effort that goes into a DIY kit is only a tiny glimpse of what it’s like for those who work with large batches. Hats off to you! Yarn dyeing takes skill, talent, patience and a whole ton of creativity. That local hand dyed yarn you’ve been eyeing? It’s worth it. Grab a skein or two and support a local dyer.
Remember earlier when I mentioned that I had a pattern in mind for the large fall themed skeins? Here’s a “work in progress” photo so you can see how the yarn works up. This is the V ‘My Diamond’ Scarf designed by Au Fait Crochet.

If you’ve ever wanted to learn more about the yarn dyeing process, or, simply want to get creative and try a different aspect of working with fibre, this is worth it. I definitely recommend Yoriko’s kit from Fibre Art Studio because it’s fab and I know you’ll enjoy it. I had a great time with the whole experience. It was really exciting and special to be able to create my own personalized colourways.
If you’d like to connect with me or say hello, I would love to hear from you! Find me on Instagram over at @sweet_bee_crochet or head over to the Contact page of my blog for other ways to get in touch.
Happy crocheting!
